
Produktbeschreibung
Product Description
Are you a very professional and serious maid?
No, not very serious?
Well regardless, for effective cleaning you need effective tools - meet Feather Duster!
Made out of softest feathers of a (probably) rare bird! (or most likely some avali)
It can help you swipe dust with efficiency, comfort and elegance!
Extending handle allows for longer reach when necessary, flip it around, and if you feel like it - you can even change colour of the customize the feathers!
Due to static electricity it's not recommended to clean dusty computer components
Prerequizites
Installation
Import .unitypackage file, drop the prefab anywhere on your avatar, adjust to your right hand and in most cases you should be good to go!
Prefab will attach it to right hand by default but keep in mind Flip Slider, if it's rotating in a wrong direction you just need to rotate the prefab to counter the offset
Functionality in menu by path Assets/FeatherDuster
What's included
- Unitypackage with Poiyomi material, texture, animation (.unitypackage)
- Components include physbone, VRCFury toggles (on/off, world drop, handle extension, hue shift, armature link)
- Blender and FBX files (.blend and .fbx)
- 4K PNG files of texture and maps
Performance
- Materials - 1
- Mesh - 452 triangles
- Bones - 7 bones + 1 physbone component
While textures are generated in 4K I recommend reducing texture size to 1024 or below in Unity and using compression, this way it comes out as:
- Default texture - 1024, Crunch compression ON = 159.7 KB
- Maps+Masks = ~1.9 KB
These settings are applied by default, you will need to change them only when adding new textures!
Bells and Whistles (what can base version do)

- Physbones to move feathers
- World drop
- Extend handle slider to adjust reach
- Flip around slider to adjust grip angle
- Hue shift slider to change hue of feathers only

Texture Builder (2$ Addon)
It's available here in 7$ bundle, or you can buy it separately later for 2$ in this separate post!
Or if you would like additional customizability from handle base to feathertip with provided texture builder! (Instructions below)
That adds:
- Krita and Photoshop project file containing a texture builder with a bunch of layers for easy texture customization (.kra and .psd)
You can build and adjust your own textures in provided .kra and .psd projects where each element is separated in layers to allow easy basic and fine adjustments through hue shift and other filtering options in any photo editor application (Krita, Gimp, Photoshop, or other apps available offline or online without download like Photopea) as you can see on the pictures and video, instructions for Krita (open-source free graphics editor) right below
Detailed Krita Instructions
After downloading and installing Krita you may open the project file "Duster texture builder.kra"
Step 1
On some side of the screen you should be able to find Layer Selection Menu:
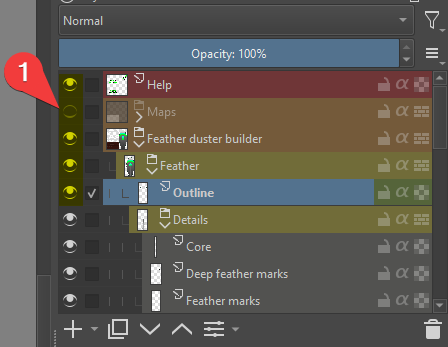 Eye icons (1) toggle layer visibility, make sure to hide "Help" layer after a read
Then go ahead and take a look through layers and select whichever you would like to keep
Step 2
To adjust colour settings of individual layers I recommend using of filters such as Hue shift, Saturation, Brightness, etc.
For that you can simply select a layer and press [Ctrl+U] to open "Filter: HSV/HSL Adjustment - Krita" window:
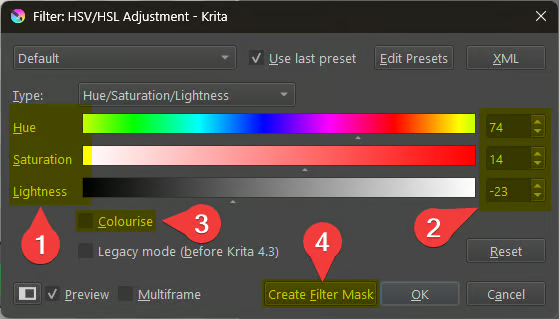 Adjust Hue, Saturation and Lightness (1) values and see what they do
Note that hue shift works only with layers that have colour, if the component is grey then make sure to check "Colourise" (3)
Whenever you are happy with how your layer looks, I recommend copying exact numbers values that appeared on the right side (2) if you want to reuse them on other layers
Click "Create Filter Mask" (4) to create a new separate filter layer which you can adjust or remove later without modifying original layer:
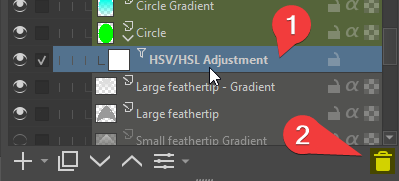 Delete filter with Trash icon (2) if you need to
Feel free to mess around, worst case you can just download Krita project again
Step 3
- Before exporting make sure you have all desired layers visible
- Export final image in PNG/JPEG format by following File -> Export...:
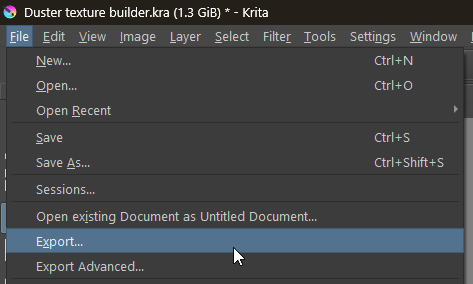 Choose a location, select file name and .png file format when prompted
Then Krita will show you this popup which you can just skip, or adjust if you know what you like to change:
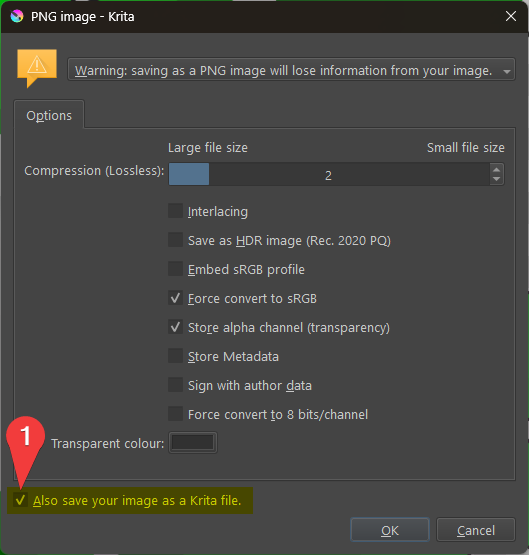 I can recommend unchecking "Also save your image as a Krita file." option before clicking OK to avoid creation of unnecessary krita duplicate files.
Exported file is now your texture for Poiyomi
Before closing Krita I recommend saving with Ctrl+S
Step 4
Add exported texture file to Poiyomi material under [Color & Normals] -> Color & Alpha -> Texture
Attributions and thanks
YumiNovawolf thank you for being a wonderful actress for the video/demonstration <3
The map you see in the recording and pictures is Midnight Rooftop made by ImLeXz
ShiftTRB for being a wonderful bean who helped me test the duster and support me through issues in Unity [Jinxxy]